-
×
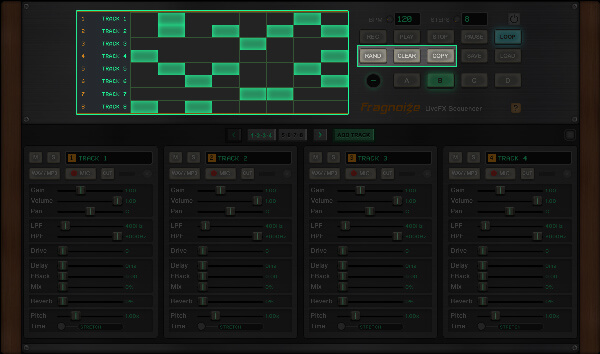
LiveFX Sequencer
Pattern & sample grid for step-based sound creation and live editing.
Designed for flexible, creative music production: program, edit, and record patterns and effects in real time.
By Miguel Feraso Cabral
How to Use the Sequencer
-
Grid Programming (Steps)
-
In the step grid, each row represents a track and each column a step in the pattern.
-
Click on a grid cell to activate or deactivate that step for the selected track. Activated cells will trigger the track's sound when the playhead reaches that step.
-
Steps (grid cells) can be activated or deactivated at any time, including while the sequencer is playing - changes are applied immediately for intuitive "live" pattern editing.
-
Use the RAND button to instantly fill the active pattern with a randomized sequence of steps, generating new ideas at the click of a button.
-
Click the CLEAR button to remove all steps from the current grid and start from a blank slate.
-
Use the COPY button to duplicate the current pattern and paste it into any of the other panels. This enables quick variation and arrangement building across patterns.
-
-
-
Master Controls
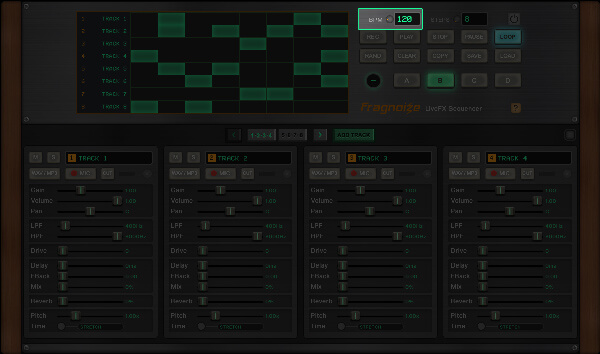
- Tempo
-
Change the overall tempo via the BPM input or by rotating the BPM knob. You can enter a value directly (20-600 BPM) or adjust smoothly using the knob by dragging vertically.
-
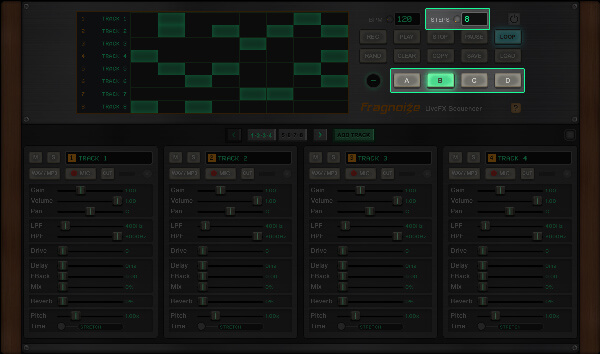
- Pattern Steps
-
Set the number of steps per pattern via the STEPS input or knob (8-16 steps per pattern). Input a number directly or use the knob for fine adjustment.
-
Switch between patterns using the dedicated selector
(A, B, C, D) for quick arrangement changes. -
- Playback and Recording Controls
-
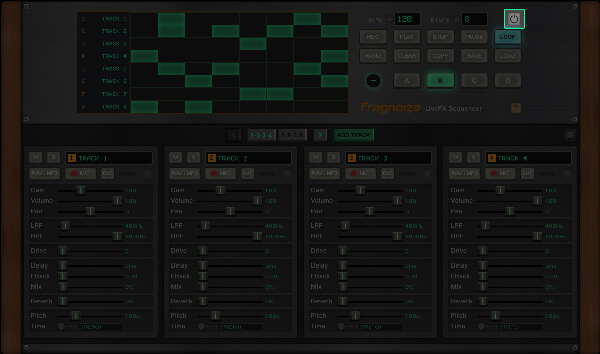
Press REC to enable master recording - this captures the final stereo output. At the end, a WAV file is exported and ready for editing or sharing.
-
Press PLAY to start playback. The playhead moves step by step along the grid, triggering any activated steps as it advances.
-
Press STOP to immediately halt playback and stop any recording in progress.
-
Press PAUSE to temporarily pause playback, allowing you to resume from the same position.
-
Enable LOOP to continuously repeat the current pattern.
-

- Reset
-
Click "Reset" button to clear all tracks, patterns, and samples, restoring the sequencer to its default state. A confirmation will be requested.
-
-
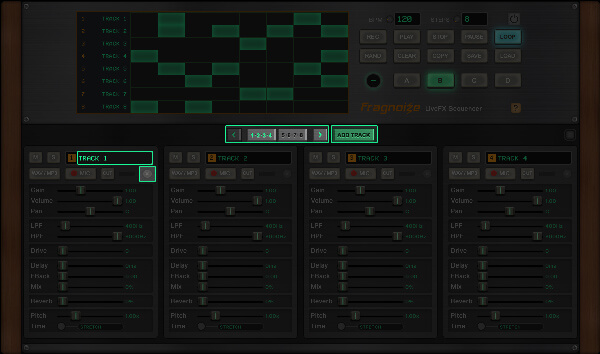
Naming, Adding, and Removing Tracks
-
Click a track’s name to rename it.
-
Use ADD TRACK to create new tracks, each with independent controls and its own sample slot. You can work with a minimum of 8 and up to 16 tracks per session.
-
If there are more tracks than visible, use the pagination buttons to navigate and edit any track.
-
Click the X (Delete track) button to remove a track. Removal is disabled when only 8 tracks remain.
-
-
-
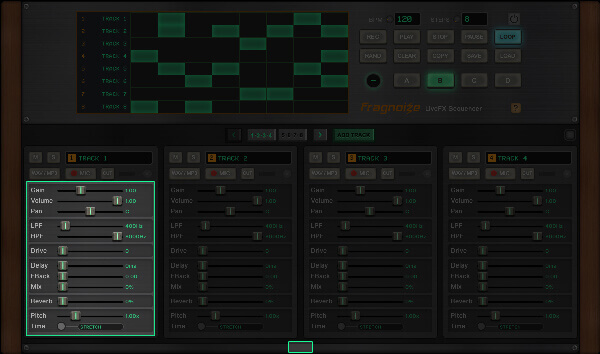
Track Controls
- Mute and Solo
-
Use M (Mute) to silence individual tracks and S (Solo) to isolate one or several tracks during playback. When one or more tracks are soloed, only those tracks will play.
-

- Effects
-
Adjust each track’s volume, pan, gain, filter (LPF/HPF), drive, delay, reverb, and pitch using the sliders. Double-click any slider to instantly reset it to its default value.
-
The "Pitch Time" button toggles pitch modes - enabling or disabling time stretching independently for each track.
-
Use the button at the bottom of the console to expand track effects: Phase, Ring Modulator, Stutter, and Arpeggiator.
-
- Adding Samples
-
To add a sound sample, drag and drop an audio file onto the WAV/MP3 button for that track, or click the button to load an audio file from your device.
-
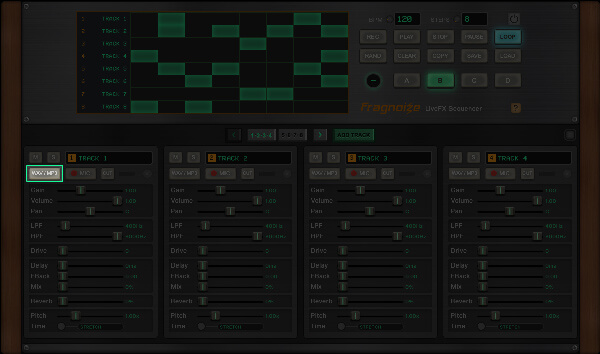
- Recording Samples
-
You can record a direct sample for any track using your device’s microphone (up to 6 seconds per track).
Click the MIC button once to start recording, and click again to stop. After recording, you can preview and edit your take before saving it to the track. -

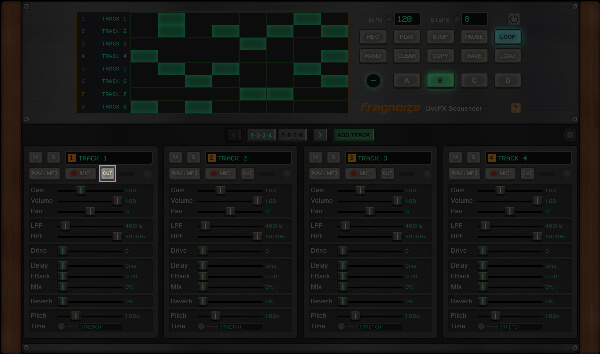
- Edit Samples
-
The CUT button allows you to precisely set start and end points for the sample of that track, so you can crop unwanted parts and achieve tight playback.
-
-
Live Editing During Playback
-
Steps (grid cells) can be toggled even while the sequencer is playing. All activations and deactivations take effect instantly.
-
All editing is non-destructive. You can freely experiment, modify steps, adjust parameters, adjust BPM, and use mute/solo without stopping playback for creative, real-time results.
-
When REC is enabled in the main controls, all real-time adjustments made to any track’s effects during playback will be captured and reflected in the master recording. This lets you record live tweaks - such as changes to volume, filters, or FX - directly into your final take.
-
-
Exporting and Importing Patterns
-
Export or import patterns with the SAVE and LOAD buttons. JSON files contain the grid state for all patterns, as well as each track’s effect parameters. Note: Audio samples are not included in saved pattern files - only note information and effect settings are stored.
-

-
-
Keyboard Shortcuts
-
Space - Play/Stop
-
R - Start/Stop Recording
-
Ctrl/Cmd + Shift + K - Randomize Pattern
-
Ctrl/Cmd + Delete/Backspace - Clear Pattern
-
Ctrl/Cmd + C - Duplicate Pattern
-
Ctrl/Cmd + S - Save Pattern
-
Ctrl/Cmd + L - Load Pattern
-
Ctrl/Cmd + T - Add Track
-
Left Arrow - Previous Tracks
-
Right Arrow - Next Tracks
-
Ctrl/Cmd + Shift + Delete/Backspace - Reset Project
-
Created, designed and developed by Miguel Feraso Cabral
November 2025
Written in Html, CSS and JavaScript/jQuery. Powered by Web Audio API.
Pitch shifter effect based on 'Jungle' by Chris Wilso
©2012, Google Inc. All rights reserved.
Reverb Impulse Response - AKG BX25 (1.5s).
Font 'Creato Display'
©2021 by Anugrah Pasau
Licensed under the SIL Open Font License, Version 1.1.
Font 'Electronic Highway Sign'
2011 by Tom Oetken [Ash Pikachu Font]